
Inspired by this article we decided to create our own Network File System using a Raspberry Pi.
The process is as follows:
Configure NFS on your Raspberry Pi
For the purpose of this post, we will be using a USB drive connected to the Raspberry Pi. We will also be using Raspberry Pi OS (formerly Raspbian) as the operating system on the device.
Configuration has these steps:
- Install the required dependencies
- Prepare a mount point for your NFS share
- Mount the drive to the mount point
- Expose the mount point using NFS
Install the required dependencies
To host an NFS share on your Raspberry Pi we need to install the nfs-kernel-server package. This package enables the NFS protocol.
sudo apt-get update
sudo apt-get install nfs-kernel-server
At this point we now want to enable and start our NFS service:
sudo systemctl enable nfs-kernel-server.service
sudo systemctl start nfs-kernel-server.service
Prepare the mount point for your NFS share
We need to create a path where the share will be mounted. For the purposes of this post, we will be using the path /mnt/nfs.
sudo mkdir -p /mnt/nfsWe need to ensure that we have proper permissions on this share, otherwise clients of the share won’t be able to write to it.
The below set of commands do three things: makes the pi user and group the owner of the mount point, ensures we have the required permissions on all the directories on the mount point, and lastly ensures that any files have the required permissions.
sudo chown -R pi:pi /mnt/nfs
sudo find /mnt/nfs/ -type d -exec chmod 755 {} \;
sudo find /mnt/nfs/ -type f -exec chmod 644 {} \;
Mount the drive to the mount point
We need to mount the drive to the prepared mount point, but before we can do that we need to identify our drive. First, we find the path to the drive:
sudo fdisk -lThis command will list all connected devices. Here is an example of the portion related to a USB drive:
Disk /dev/sda: 114.6 GiB, 123060879360 bytes, 240353280 sectors
Disk model:  SanDisk 3.2Gen1
Units: sectors of 1 * 512 = 512 bytes
Sector size (logical/physical): 512 bytes / 512 bytes
I/O size (minimum/optimal): 512 bytes / 512 bytes
Disklabel type: dos
Disk identifier: 0x00000000

Device     Boot Start       End   Sectors   Size Id Type
/dev/sda1          32 240353279 240353248 114.6G  c W95 FAT32 (LBA)
We can mount the USB drive to the prepared mount point as follows:
sudo mount /dev/sda1 /mnt/nfsWe want to ensure that the mount is automatically configured when the device reboots. To do that we need to obtain a few more pieces of information. We need to identify the UUID related to this drive so that we can configure the mount. Take note of the UUID and TYPE using the command below so that we can use it in the mount configuration.
sudo blkid /dev/sda1

/dev/sda1: UUID="721B-EFD1" TYPE="vfat"
The last pieces of information we need are the identifiers related to the pi user. Take note of the UID and GID values.
id pi

uid=1000(pi) gid=1000(pi)....
To ensure the mount is configured upon startup we add an entry to the /etc/fstab file. Start editing the file:
sudo nano /etc/fstabThen add the required line to configure the mount. Use the UUID, UID and GID values we obtained previously. The UUID identifies the device to mount and the UID & GID defines what user & group to use for the mounting (this is especially important if your drive uses Windows-based file systems like FAT). The format of the entry is as follows:
UUID="<UUID of Device>" <path to mount point> <device filesystem type> <options> <freq> <passno>The filesystem type we got from our blkid command previously and the options include the UID & GID we noted. We also configure some other options that affect the behaviour of the share. Consequently the entry we create for our example is:
UUID="721B-EFD1" /mnt/nfs vfat rw,nosuid,nodev,nofail,noatime,uid=1000,gid=1000 0 0Expose the mount point using NFS
The NFS server reads the /etc/exports file to know which paths to share. We need to add the path of our drive’s mount point using this file.
sudo nano /etc/exportsThe basic format of the entry we need to add is as follows:
<path to share> <IP address that may access>(<options>)The IP address value may be a mask that allows a range of IP addresses access. The options include the UID & GID we identified earlier so that our pi user is used whenever a client accesses the NFS share. We also configure some other options that help with performance and sets up user security correctly. Consequently, our entry looks like this:
/mnt/nfs 192.168.0.0/16(rw,all_squash,insecure,async,no_subtree_check,anonuid=1000,anongid=1000)At this point we now want to restart our NFS service in order for the changes to take effect:
sudo systemctl restart nfs-kernel-server.serviceConnect to the share from client devices
We can connect to the share from various other client devices. For this post, we will look at these clients:
- Connect from Windows
- Connect from Debian-based systems (which includes other Raspberry Pi OS-based devices).
Connect Windows machines to the NFS share
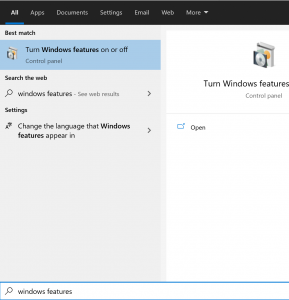
To connect a Windows machine to the NFS share we first need to enable the NFS client. Go to the Windows start menu, type “Windows Features” and then select “Turn Windows features on or off” from the menu.
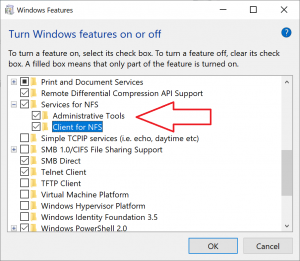
Then enable all the options for “Services for NFS”:
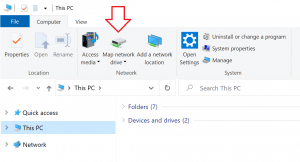
Once that is done you can map the NFS share as a network drive in Windows Explorer. Click on “This PC” and then go to the “Computer” tab.
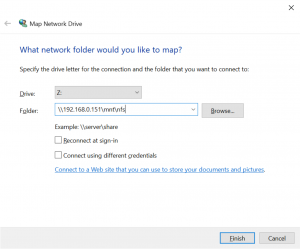
Lastly capture the path to the NFS share with the Raspberry Pi’s IP address:
Connect from Debian-based systems
To connect to the NFS share from Debian-based systems, like Ubuntu or Raspberry Pi OS, we first need to install the libnfs-utils package.
sudo apt-get install libnfs-utilsWe need to create a mount point for the share:
sudo mkdir /mnt/nfsThen we simply mount to the share:
sudo mount 192.168.0.151:/mnt/nfs /mnt/nfsTo ensure that the mount is configured again on reboot we add it to the /etc/fstab file (like we did on the NFS host).
192.168.0.151:/mnt/nfs /mnt/nfs nfs auto 0 0